.larswmrc
.xinitrclarswm is a minimalistic windowmanager for X11 that hardly uses any resources at all. This is very important for running an X-system on old hardware or for people who want to work efficiently rather than wait for see-through, blinking windows to build up and tear down performance and, as some OS prove, system stability. larswm compared to KDE is somewhat like vim compared to Staroffice or lynx compared to Mozilla.
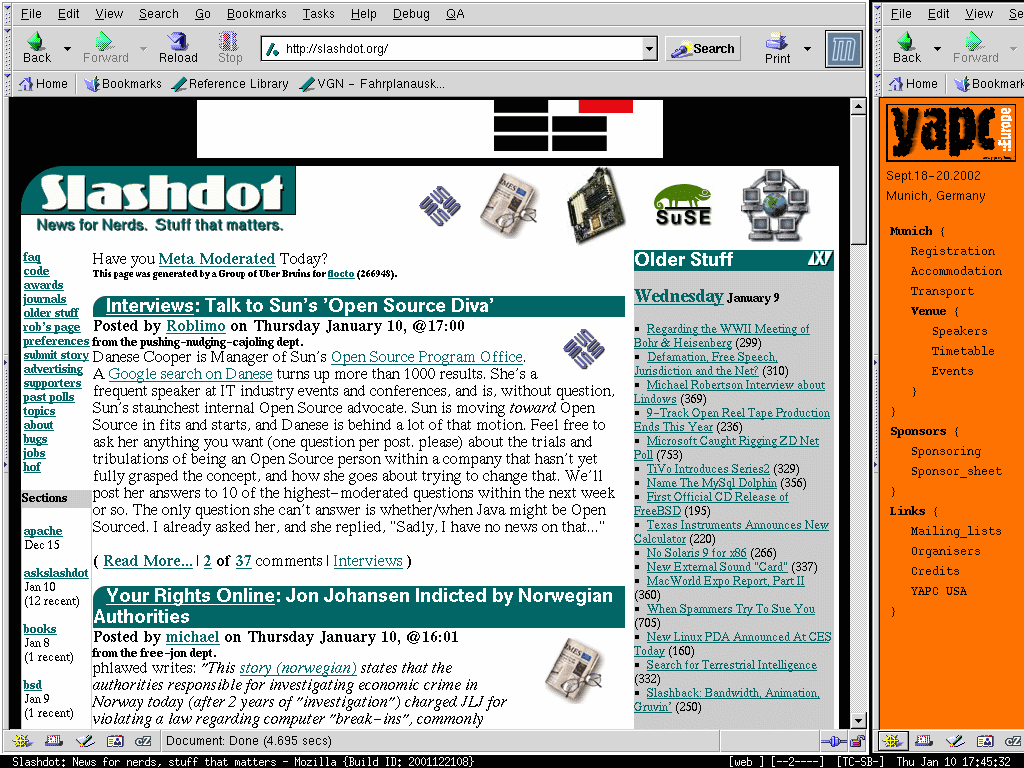
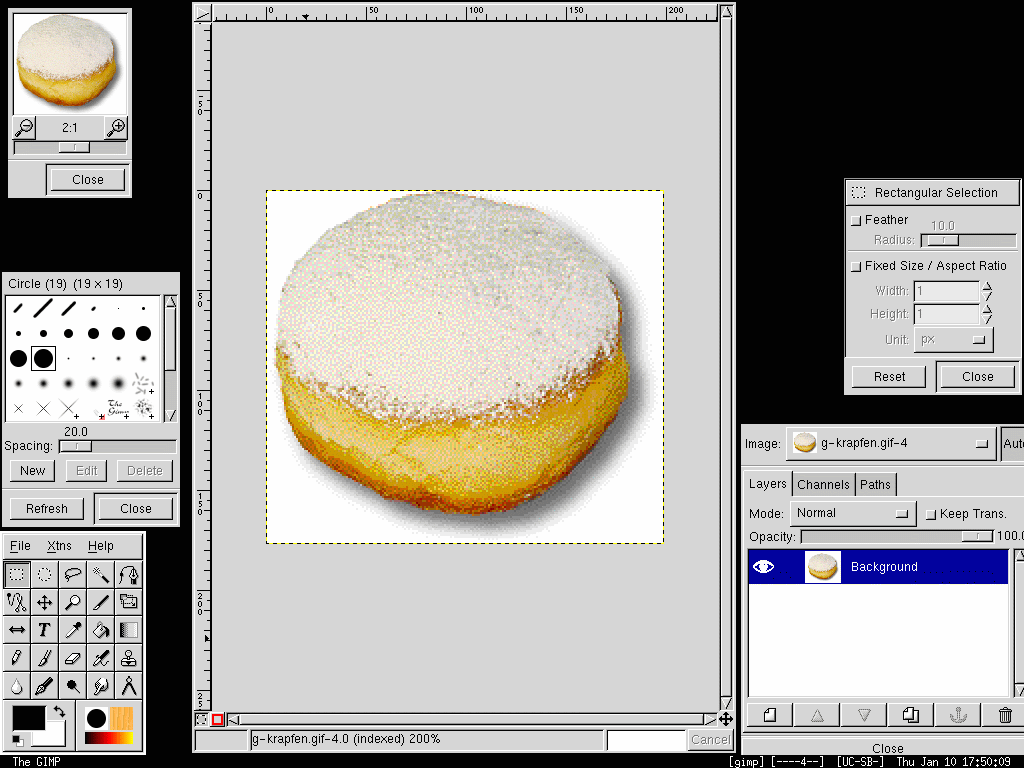
Here are some screenshots to give you a first impression of what larswm looks like. All images have dimensions of 1024x786 Pixels:
To get the newest version of larswm check the official larswm homepage. A copy of larswm-7.0.16.tar.gz (the newest version at the time of this writing) is available from my webserver, too.
Although it is said in the README file I'll say it again since it's somewhat different from the standard procedure. First, you have to create the Makefile by using xmkmf and secondly you have to make and install the program. You need to have root privileges to install larswm, so talk to your sysadmin if you don't have access to a root account. Here is how it works:
root@leeloo:~/larswm-7.0.13 # xmkmf -a
root@leeloo:~/larswm-7.0.13 # make install install.man
.larswmrcAfter you successfully installed larswm you will need to configure it, otherwise it would be somewhat boring and rather useless. I suggest you create a config file with all default values and just edit the ones you don't like. This works like that:
octopus@leeloo:~ $ larswm -defaults >.larswmrc
In larswm you have different window classes, namely toolclass, floatclass, stickyclass and dotileclass. Additionally you can assign windows to a fixed desktop using dtclass. The way of telling larswm which windows to tile is by their class and (optionally) instance. (This is basically the "WM_CLASS"-XAtom..) The easiest way of determing a window's class/instance is by using the larswm-menu: To access the menu press Control and click on the statusbar using your mouse. Left- and rightclick move back and forth in the menu, middleclick (de-)activates the selected item. A complete listing of available mouse commands (including all commands for the menu) can be found in the file mouse_refcard.ms in our larswm-directory (in troff/tbl format). The menu-item you want for your configuration is number 4: "Show class info on status bar?". Please keep in mind that this configuration is case-sensitive!
Here is my very own .larswmrc for you to have some orientation. Some settings (the ones to move and resize windows in particular) are not as good as the default values, but I had to change them due to the fact that my keyboard doesn't have a num-block. (download)
! * * * * * * * * * * * * * * * * * * * * * * * * * * * * * * * * * * *
! * larswm 7.0.16 configuration by Florian "octo" Forster             *
! *                                                        2002-06-28 *
! * * * * * * * * * * * * * * * * * * * * * * * * * * * * * * * * * * *
!
! Background: Black; Foreground: White
larswm.foreground: white
larswm.background: black
!
! Install seven desktops on each monitor
larswm.desktops: 7
!
! Set desktop names
larswm.0.0.dtname: [zero] [0------]
larswm.0.1.dtname: [work] [-1-----]
larswm.0.2.dtname: [web ] [--2----]
larswm.0.3.dtname: [gimp] [---3---]
larswm.0.4.dtname: [    ] [----4--]
larswm.0.5.dtname: [    ] [-----5-]
larswm.0.6.dtname: [    ] [------6]
!
larswm.1.0.dtname: [zero] [0------]
larswm.1.1.dtname: [work] [-1-----]
larswm.1.2.dtname: [xmms] [--2----]
larswm.1.3.dtname: [gimp] [---3---]
larswm.1.4.dtname: [    ] [----4--]
larswm.1.5.dtname: [    ] [-----5-]
larswm.1.6.dtname: [    ] [------6]
!
larswm.2.0.dtname: [zero] [0------]
larswm.2.1.dtname: [one ] [-1-----]
larswm.2.2.dtname: [two ] [--2----]
larswm.2.3.dtname: [thre] [---3---]
larswm.2.4.dtname: [four] [----4--]
larswm.2.5.dtname: [five] [-----5-]
larswm.2.6.dtname: [six ] [------6]
!
! Set wether or not larswm should resize tiled windows
larswm.?.?.tile_resize: False
larswm.?.0.tile_resize: True
!
! Set tiled windows' width
larswm.?.?.left_track_width: 65
larswm.?.1.left_track_width: 80
larswm.?.2.left_track_width: 90
larswm.2.?.left_track_width: 90
!
! Skip tiled windows when changing focus
larswm.?.?.skip_focus: True
!
! Send all clicks to the windows
larswm.?.?.clickthru: True
!
! Set some shortcuts:
larswm.application.0: xterm -bg black -fg white +sb
larswm.application_key.0: Return
larswm.application_mod.0: Alt
!
larswm.application.1: larsremote exit
larswm.application_key.1: q
larswm.application_mod.1: Control+Alt
!
larswm.application.2: netscape
larswm.application_key.2: n
larswm.application_mod.2: Control+Alt
!
larswm.application.3: gimp
larswm.application_key.3: g
larswm.application_mod.3: Control+Alt
!
larswm.application.4: xmms
larswm.application_key.4: m
larswm.application_mod.4: Control+Alt
!
larswm.application.5: larsremote restart
larswm.application_key.5: r
larswm.application_mod.5: Control+Alt
!
! You could set up some applications to start when clicking onto the root window
!larswm.button1.application: command
!larswm.button2.application: command
!larswm.button3.application: command
!
! Set xload to be seen on all desktops (but not on all monitors..)
larswm.toolclass.0: XLoad
!
! Set the gimp's main window to stay "always on top" (Doesn't work :( Bug?!)
larswm.floatclass.0: Gimp~info_dialog
!
! Set up sticky windows here if you need any
!larswm.stickyclass.0: Class~Instance
!
! Set the applications that should be tiled
larswm.dotileclass.0: XTerm
larswm.dotileclass.1: Netscape~Navigator
larswm.dotileclass.2: Mozilla-bin~mozilla-bin
!
! Set fixed desktops for certain programs
larswm.dtclass.0: Netscape
larswm.dtnum.0: 2
!
larswm.dtclass.1: xmms
larswm.dtnum.1: 3
!
larswm.dtclass.2: Gimp
larswm.dtnum.2: 4
!
larswm.dtclass.3: Xsane
larswm.dtnum.3: 5
!
larswm.dtclass.4: Mozilla-bin
larswm.dtnum.4: 2
!
! How to cicle through the desktops
larswm.prev_desktop_key: Left
larswm.prev_desktop_mod: Mod4
larswm.next_desktop_key: Right
larswm.next_desktop_mod: Mod4
!
! How to skip focus
larswm.prev_window_key: Tab
larswm.prev_window_mod: Shift+Alt
larswm.next_window_key: Tab
larswm.next_window_mod: Alt
!
! How to move non-tiled windows
! The defauls use the num-block. My keyboard doesn't have one so I set it up in a different way
larswm.move_north_key: Up
larswm.move_north_mod: Shift+Control
larswm.move_west_key: Left
larswm.move_west_mod: Shift+Control
larswm.move_east_key: Right
larswm.move_east_mod: Shift+Control
larswm.move_south_key: Down
larswm.move_south_mod: Shift+Control
!
larswm.move_up_key: Up
larswm.move_up_mod: Shift+Alt
larswm.move_down_key: Down
larswm.move_down_mod: Shift+Alt
larswm.move_left_key: Left
larswm.move_left_mod: Shift+Alt
larswm.move_right_key: Right
larswm.move_right_mod: Shift+Alt
!
! How to resize non-tiled windows
larswm.grow_vert_key: Up
larswm.grow_vert_mod: Shift+Control+Alt
larswm.shrink_vert_key: Down
larswm.shrink_vert_mod: Shift+Control+Alt
larswm.grow_horiz_key: Right
larswm.grow_horiz_mod: Shift+Control+Alt
larswm.shrink_horiz_key: Left
larswm.shrink_horiz_mod: Shift+Control+Alt
!
! Center window (new in version 7.0.16)
larswm.move_select_key: space
larswm.move_select_mod: Shift+Control
!
! How to clode applications that don't exit themselves
! This is important, otherwise you will have to use kill a lot!
larswm.close_key: w
larswm.close_mod: Control+Alt
!
! This is how to get to the desktops..
! Ok, I copied from windowmaker, so?! That's open source.. ;)
larswm.goto_desktop_key.0: 0
larswm.goto_desktop_mod.0: Alt
larswm.goto_desktop_key.1: 1
larswm.goto_desktop_mod.1: Alt
larswm.goto_desktop_key.2: 2
larswm.goto_desktop_mod.2: Alt
larswm.goto_desktop_key.3: 3
larswm.goto_desktop_mod.3: Alt
larswm.goto_desktop_key.4: 4
larswm.goto_desktop_mod.4: Alt
larswm.goto_desktop_key.5: 5
larswm.goto_desktop_mod.5: Alt
larswm.goto_desktop_key.6: 6
larswm.goto_desktop_mod.6: Alt
A complete list with all configuration options is available here. Check out the excellent manual when you humble over questions not answered on this site.
.xinitrcSo, now that your larswm is installed and configured you have to start it. This is done via the .xinitrc (or on some systems the .xsession) file. This is the file I am using as an example and might not work for you, so odds are you will have to edit it. (download)
#!/bin/sh

# Set background and cursors for all monitors
xsetroot -d :0.0 -cursor_name top_left_arrow -bitmap .background
xsetroot -d :0.1 -cursor_name top_left_arrow -solid black
xsetroot -d :0.2 -cursor_name top_left_arrow -solid black

# Load xload on the first Monitor
xload -geometry 64x64-0-0 -update 2 -nolabel -bg black -fg white&

# Start larsclock and save it's PID
larsclock &
BGPID=$!

# Start ssh-agent and larswm
/usr/bin/ssh-agent /usr/X11R6/bin/larswm

# After larswm being done kill larsclock
kill $BGPID

# Exit from this script
exit 0
Congratulations, you should have a working larswm installation. It wasn't all that difficult, was it? When tuning your .larswm keep in mind that larsremote restart restarts larswm without restarting your X server. Good luck :)